Wordpress on a Google Compute Engine f1-micro
Posted on Tue 04 October 2016 in SysAdmin
The cheapest offering on Google's cloud platform is the f1-micro instance. The f1-micro is a shared core machine which provides access to a single, virtualised CPU core (with burst capability to help with sudden load spikes) and a meagre 0.6GB of memory: these specs don't sound great, but it turns out you can just about cram a moddest-traffic Wordpress instance on it with a little tweaking - and here's the good news, it'll only set you back £50 a year!
Creating a new Instance
Head on over to the Google Cloud Console and sign up (Google currently offer a 60 day free trial to sweeten the deal). Battle your way through the onboarding guide and then head over to the Google Compute Engine control panel.
- Click create Instance
- Select the region closest to you (ie: US or EU)
- Select your machine type (micro 1 shared vCPU)
- Choose which distro you want to boot into (I am using Debian Jessie) and change the Boot disk size if desired (although the default, 10GB, is plenty)
- Make sure you check the Allow HTTP and Allow HTTPS Traffic checkboxes under Firewall settings.
- Click create and wait for Goolge to provision your instance.
Once your machine has been provisioned (should only take a couple of minutes) you can connect direct from your browser by clicking the SSH button from the Compute Engine VM Instance Control Panel.

You can also click this drop down to setup SSH access from the command line by adding an SSH KeyPair or by using gcloud command line interface.
Obtaining a Static IP
By default, Compute Engine instances are assigned an ephemeral IP (meaning that it may change should the instance shutdown); for production websites you need to assign a static IP to your instance so you can point your doman at it; this can be done through the Networking External IP Addresses Control Panel - you can select a the 'Regional' type selecting the same region where your instance is running (eg: europe-west-1).
Base LEMP Setup
The following is based off a stock Debian Jessie install; I make use of Nginx (less CPU and memory intensive then Apache), PHP-FPM (connects Nginx and PHP), PHP 5 and MySQL. The following command will install all of the required dependencies:
$ sudo apt-get install mysql-server nginx php5-fpm php5-mysql php-apc \
    pwgen python-setuptools curl git unzip php5-curl php5-gd php5-intl \
    php-pear php5-imagick php5-mcrypt php5-pspell php5-recode \
    php5-sqlite php5-xmlrpc php5-xsl
Once installed; you will need to tweak your php-fpm settings, and change the cgi.fix_pathinfo setting from 1 to 0:
$ sudo sed -i "s/;cgi.fix_pathinfo=1/cgi.fix_pathinfo=0/g" /etc/php5/fpm/php.ini
You may also want to increase the max upload filesize from the 2MB default:
$ sudo sed -i "s/upload_max_filesize =.*/upload_max_filesize = 20M/g" /etc/php5/fpm/php.ini
$ sudo sed -i "s/post_max_size =.*/post_max_size = 20M/g" /etc/php5/fpm/php.ini
Now configure Nginx's default site by editing /etc/nginx/sites-available/default:
server {
        listen   80;
        listen   [::]:80 default ipv6only=on;
        root /usr/share/nginx/www;
        index index.php;
        client_max_body_size 20M;

        location / {
                try_files $uri $uri/ /index.php?q=$uri&$args;
        }

        location ~ \.php$ {
                include snippets/fastcgi-php.conf;
                include fastcgi_params;
                fastcgi_split_path_info ^(.+\.php)(/.+)$;
                fastcgi_pass unix:/var/run/php5-fpm.sock;
        }
}
When you make changes to your configuration, you will need to restart the associated services:
$ sudo service nginx restart
$ sudo service php5-fpm restart
This configuration will serve php from /usr/share/nginx/www - drop an index.php file there which invokes phpinfo() and visit your Compute Engine instance's IP address in your browser to confirm that everything has been configured - make sure you delete that file once you're done.
Wordpress Install
Now the easy bit :) Start by grabbing wordpress:
$ cd /usr/share/nginx
$ wget https://wordpress.org/latest.tar.gz
$ tar xvf latest.tar.gz && rm latest.tar.gz
$ mv wordpress www
$ chown -R www-data:www-data
$ chmod -R 766 ./www/wp-content/uploads
You can now visit your Compute Engine instance's IP address in your browser and the Wordpress installation script should start; you may want to consider creating a MySQL user for wordpress without GRANT and ALTER permissions.
Enabling Automatic Updates
Wordpress will automatically install security patches if it has a way to write to the local filesystem; one option is to configure the FS-METHOD constant in your wp-config.php to use direct and grant the permissive permissions on your /usr/share/nginx/www folder; generally speaking this is fine if you only have a single Wordpress installation running on the server, however you may wish to consider setting FS-METHOD to ssh2 and setting up an SSH key/pair.
Sending Email
If you need your Wordpress instance to be able to send email (eg: for a contact form); then you may wish to consider installing the WP Mail SMTP Plugin which will reconfigure Wordpress to route all mail through an SMTP server (ie: a GMail account).
Backups
If you care about your content, it's essential that you back up both the database and the wp-content folder on a regular basis. I've personally found the BackupWordPress plugin does a great job for creating local archives on the sever; these can then be shipped over to Google Drive by using gdrive and cron: don't forget to restore from your backup from time-to-time.
Additionally, you can make use of the Compute Engine Snapshot feature which makes disaster recovery straight-forward.
Wordpress Hardening
Because of the limited resources avaliable to your instance, it's possible for qutie meagre Denail of Service (DoS) attacks to peg your server's CPU or even knock it offline (by running out of memory).
In my case, just minutes after I had got gotten Wordpress configured the nginx access.log (/var/log/nginx/access.log) started filling up with the following entries:
192.69.89.173 - - [02/Oct/2016:21:13:50 +0000] "POST /xmlrpc.php HTTP/1.1" 499 0 "-" "Googlebot/2.1 (+http://www.go
ogle.com/bot.html)"
192.69.89.173 - - [02/Oct/2016:21:13:50 +0000] "POST /xmlrpc.php HTTP/1.1" 499 0 "-" "Googlebot/2.1 (+http://www.go
ogle.com/bot.html)"
That host was hitting me with ~12 requests per second which was enough to spike my CPU usage and cause significant slow-down.
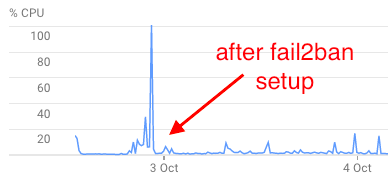
Fail2Ban
Fail2Ban scans your server's log files and can be configured to ban IP addresses based on filters you define.
Start by installing and enabling fail2ban with:
$ sudo apt-get install fail2ban
Next create a new filter in /etc/fail2ban/filter.d/wordpress.conf
[Definition]
failregex = <HOST>.*POST.*(wp-login\.php|xmlrpc\.php).* (403|499|502)
Next copy /etc/fail2ban/jail.conf to jail.local and append a new rule:
[wordpress]
enabled  = true
port     = http,https
filter   = wordpress
logpath  = /var/log/nginx/access.log
maxretry = 3
bantime  = 3600
This configuration will allow 3 such log entries before banning that IP for 1 hour.
WP Super Cache
WP Super Cache plugin is essential for a Wordpress install on a low-end server - installation is straight forward from the Wordpress Admin.
CloudFlare
If you don't mind giving up control over your DNS, you can put your install behind CloudFlare's free plan which should go some way to reducing the amount of traffic that hits your server.
Offloading Comments
Wordpress comments can cause a serious headache for low-end instances as they are the source of a lot of spam and will increase the amount of cache invalidation that needs to occur. Whilst plugins like Akisment (which comes installed by default) certainly help with the former, external comment platforms like Disqus integrate seamlessly into Wordpress if you don't mind giving up a bit of control over your content.